Saturday, March 30, 2019

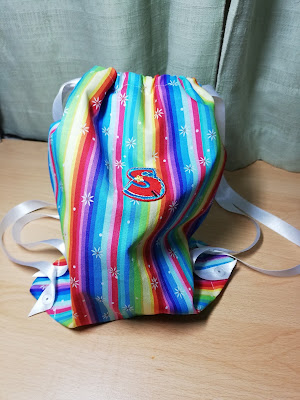
Drawstring backpack

My daughter loves trains, so a while ago I hunted through my local crafty shop for some train fabric, bought a metre and then thought “what can I actually make with this?” Someone suggested I make her a little bag, so I figured I could make her a drawstring bag that she could use as a backpack to carry her toys around in. I’ve made myself a drawstring bag previously to use as a dice bag, so I knew they weren’t too hard, I just needed to work out the size and how to attach the strings so it could be a backpack.
I then got a bit carried away with myself and decided to make some for her little friends, too, so the pictures in this will have a few different fabrics but the bags are all made the same way. You could probably make one in an evening or two, it took me less than a week to make three (and some days I only have an hour to do sewing).
I based my design on this tutorial by Kristin Omdahl, but I’ve adapted it so I thought I’d do a proper tutorial for this version.

Materials list - for a toddler sized backpack
Fabric - depending on the pattern of the fabric, you might need more but you should be able to make one bag out of a fat quarter, or two bags out of half a metre of fabric.
Cotton thread - to sew it together with
Cord or ribbon - for the drawstrings. For toddler sized straps, you’ll need two metres length. For it to be comfortable on an adult, you’ll need 2.5 to 3 metres.
Something to attach the strings to the corners of the bag - I used Kam snaps so that I can easily detach and replace the strings if they get broken or are the wrong length, but you could also make a reinforced hole in the corner of the bag (using a metal ring or something similar) and thread the strings through that.
Other useful items - sewing machine (as it’s all straight stitch you could sew it by hand but it would take a lot longer), iron, needle to sew in the ends, pins, scissors, bodkin or safety pin to thread the string through the channel. If you’re using Kam snaps as an attachment, you’ll need a press to attach them with also. Most suppliers of the snaps will sell the presses too.

How big a piece of fabric do I need?

This took me a while to figure out, but finally I worked it out with help from a sketch that I made. Measurements are in inches because the numbers are smaller for me to work out, but the principle is the same whatever measurements you use.
1. Decide how big a bag you want.  Length (x), height (y) and width of the bottom (w).
2. How much seam allowance (a) do you want? (I used half inch seams, partly because it made the numbers easy to work out, partly because that was in the tutorial I was following)
3. How wide a channel (c) do you want for your strings? (As I am using ribbon, my channels ended up about an inch wide).
4. Are you using one piece of fabric folded at the base, or two pieces sewn together? (If you’re using one piece, double the length and take off 2a)
5. Maths time! (See my sketch)
a) Two pieces of fabric: x + 2a by y + 2a + 2c + 0.5w
For a bag 10” long by 10” high with a bottom width of 3”, I used two pieces of fabric 11” by 15”. As it’s a bag, the size can vary to suit how big your fabric is - i had a piece of fabric that was 40” wide so I cut the pieces 10” wide for that so that I could make two bags from the one piece of fabric.
b) One piece of fabric: x + 2a by 2(y + 2c + a + 0.5w)
For a 10” long by 10” high bag, I would use one piece of fabric 11” by 28”. This only works if you have a fabric pattern that doesn’t matter if it’s upside down, though!

These instructions will be for making the bag out of two pieces of fabric, but the tutorial I linked above uses only one piece so refer to that if my instructions are confusing you.
Step One: Iron your fabric!
It might seem like a waste of time but it is essential if you want to measure the fabric properly and have it turn out looking good.
Step two: Measure fabric, mark out, check it! Cut it.
Especially check that you have marked out a rectangle with square corners and not drawn one of the edges slightly wonky.
Step Three: Press and sew the hems
Fold over half an inch of fabric on each side and press it with an iron (if you get a good enough crease with the iron, the fold will stay and you won’t need to pin it). Sew the hems a quarter of an inch in from the fold (if you have fabric that’s likely to fray a lot, you might need to do a double fold so that the raw edge is turned under when you sew it.)
Step Four: Channel for the drawstring
Check how big of a channel you want and fold down the top edge of each piece of fabric so that it will be wide enough for the string to run through easily. You will have two strings so make sure you allow for them both if you’re using thick cording as a string. Stitch along the line you sewed for the hem so that the channel stays the same size all the way along.
Step Five (optional): decorate your fabric
If you have anything to decorate the bag with (I added a letter motif for the child’s initial), now is the best time to add it as you can judge the position on the finished bag. Remember that the final bag will be an inch or so shorter than the fabric you have now as we haven’t allowed for the base yet.
Step Five: Pin together and make up
If you’ve been careful with your measuring and consistent with your hems etc, you should now have two rectangular pieces of fabric the same size as each other. I was slightly lazy with my hemming accuracy so the two pieces were not quite matching. Either way, the critical bit is that the two channels line up with each other - any excess at the base of the fabric will just go into the seam inside the bag and nobody will ever know except you!
Press the fabric again so it looks neat, then pin the two pieces right sides together, making sure that the two channels line up. Stitch along the hem lines of the two sides and bottom (if your fabric isn’t perfectly aligned, put the smaller piece on top so you can check that you are catching the edge in you stitching). Stop just by the top hem that is now forming the channel so that you don’t sew up the channel or the top of the bag.
Turn it the right way out. You now have a decent looking bag! You will need to use something like a pencil to make sure the corners are turned out as well as you can get them - the two hems meeting make the corner a little too bulky to turn out all the way.
Step Six: The base
Fold the bottom corner flat so that it’s like a triangle. (See picture). Measure across the width that you want your bag to be, mark and pin along that line. Stitch along the line - you will now have your bag with two little flaps at each corner, that you can attach the strings to.

Step six: the drawstrings

Cut two lengths of string/ribbon/whatever you’re using. I’m using ribbon so that I can attach the Kam snaps to the end easily. For toddler size straps, you’ll want two lengths of one metre each approx. Using a bodkin or a safety pin, thread them through the channel so that you have two strings, running all the way around the channel, in opposite directions, with the loose ends coming out of the ends of the channel at each side of the bag. Attach the snaps - I wanted each end to be separate, so I used four snaps total for each bag. You’ll need one on the corner of the bag and a corresponding one on the end of the ribbon. If you’re making a reinforced hole to thread the strings through, you can do that before or after you thread the strings. The just thread them through the hole and knot them.

And there you have it! A lovely bag!

Note: A closed loop like the drawstrings can be a strangulation risk for babies and small children. That’s one reason why I used the snaps and attached the strings separately - in the hope that the snaps would form a weak point in the event of getting caught around the neck or arm. HOWEVER snaps like the ones I use are not actually designed for that purpose, so you should never leave a baby or child unsupervised with it just in case.

Friday, March 29, 2019

Toddler apron!

My toddler likes helping me bake, so my friend’s mum made her a little apron that she could wear.
My friend’s little girl also likes to bake, so I decided to use the one we have as a pattern to make her a present.
It’s very easy once you have the measurements so here’s a sketch:
I made a narrow hem using the hemming foot on my sewing machine, but if you don’t have a special foot you can just do a normal hem making sure that the raw edges are turned under so it doesn’t fray. That’s actually what I did on the top and bottom hems anyway.

Then I attached the ribbons for the apron strings. First I folded over about a quarter of an inch at the end as a hem so that it wouldn’t fray. I put Velcro on the neck ties so that it can be adjustable but also easy to take on and off. Lengths for the ribbons: 2 lengths of 15” long for the waist ties, 1 length of 8” long with about 1” Velcro (the scratchy hook side), 1 length of 12” long with about 4” Velcro (the soft loop side).


Finally, I also got some appliqué letters to spell out her name across the front.
I hope she likes it!

Monday, March 25, 2019

Starting to sew again: Snowman advent calendar

Not long after I had made my vampire cosplay, I found out I was pregnant and so the bedroom that I was using to sew in got taken over as a nursery and my poor sewing machine got put away in a cupboard for two years. It was always on my list of things to get back to at some point, so when I saw a kit for an advent calendar at Christmas time I couldn’t resist buying it to make for my daughter for next year. Eventually I got around to clearing the desk in the box room and turning it from a general dumping ground into a sewing room so I could settle down in the evenings and make the advent calendar.
The cutting out, pinning on and stitching on of all the little pockets took longer than all the other making up. I hate sewing in ends so I’m not sure why I thought it was a good idea to sew twenty five pockets onto a piece of fabric was a good idea. Each pocket had to be hemmed at the top as well so that was a hundred ends to sew in! Not to mention that I accidentally hemmed the wrong edge of pocket number nine so I almost had two number sixes.
Finally it was done, about a month after I started it but I did go on holiday for a week, so actually it’s not too bad. And it looks pretty good too. I hope she likes the Snowman...

Sunday, March 24, 2019

Past Crafts: Vampire Cosplay

One of my other hobbies is playing the trading card game Magic: the Gathering (not that I play very much these days but before my daughter was born I was more active). They release a new set of cards about four times a year, and in 2016 they released this card:
Heir of Falkenrath Gatherer Link
My first thought was “what a cool dress! I’d love a dress like that” and since I was going to a large tournament in Manchester while that card was current, I decided to make a cosplay.

So, where to start? Firstly I took a look at a larger sized image of the card art (the artist is Jason Rainville, by the way). In a way I’m lucky that this card has two images to work from as the two angles give me more of an idea of how the dress would be constructed.
Obviously it’s strapless, and looking at the second image you can see that the sleeves are actually completely separate, not like some dresses you would get that have the sleeves connect to the bodice without having fabric on the shoulders. So I decided that the easiest way to create that for an amateur like myself would be to buy a corset and decorate that, making the accessories.

Bodice decoration
Most corsets are not just laced up the back, but also have a fastening up the front formed from a pair of metal strips that hook together (a  busk). This means that you can get the corset on and off easily without having to completely unlace the back or pull it over your head. Obviously the character’s dress has embroidery all the way across the front so I would need to hide the busk but also make it easy to get on and off so I made a false front decorated with a piece of bridal lace, which I attached to the corset with Velcro. My thought at the time was that I would be able to wear the corset at other times as well, but so far I’ve only worn it as part of the costume.

I had to make a couple of test pieces out of scrap fabric as well as a paper pattern so that I could make it fit the curves of the corset properly. In the end I didn’t manage to centre the lace perfectly which does annoy me a bit but not enough to re-do it.

Sleeves
As I said earlier, the red sleeves are actually totally separate from the bodice. I wanted them to be nice and puffy so I gathered them at each end and added ribbon at the top to help them stay up and lace at the wrists for decoration. One of them does fall down more than the other but I think they are pretty effective.
Cloak
While the first image seems to show the cloak being attached across the vampire’s stomach with a jewelled chain, the second image has no sign of the chain and the cloak seems to be attached around the arms. I decided for reasons of practicality that I would attach the cloak around my sleeves with velcroed ribbon so that my arms would be fairly free to move about and so that I could put on and take off the costume unaided. I found a few tutorials online for making a child’s bat-wing cloak, and I adapted a pattern. It’s basically a rectangle with some arcs cut out for the batwing shape, and I gathered the top edge slightly to shape it a little. As it was going across the back of my shoulder blades rather than over my shoulders, I could get away with a simple shape. I also attached two rings so that I could hook it to the back of the corset so that it didn’t droop at the back.
Choker
One of the key things about this character’s outfit that you might not notice at first, is that the ‘negative space’ between her choker, her neckline and her sleeves makes the shape of a bat.

The choker was therefore essential to get the batwing in my cosplay.
The main piece is just black cotton, stitched together and turned inside out so that there were no hems visible, joined at the back with hooks and eyes. I used lace and rhinestones to do the detailing, and crocheted some ‘chains’ for the big red beads that form the bat’s eyes. It may not be as perfect as the art, but if you look you can see the bat.


So that was the outfit - I managed to find a suitable skirt and some makeup (I opted to go for the civilized version rather than run around all day with fake blood all over my face)


Having spent quite a bit of time on the costume, I didn’t do very well in the tournament but I had a blast. Heres a link to the bigger versions of the card art if you’d like to admire them a bit more. Heir of Falkenrath Heir to the Night And big thanks to the artist Jason Rainville as well as all the other Magic cosplayers who inspired me to give it a go.

Friday, March 22, 2019

Dusting off the blog! Past crafts:crochet

I have been crafting recently, I just stopped blogging about it. Here’s some things that I’ve made with my crochet hook in the intervening time.
Amigurumi - I made a few little animals as presents for my nephew when he was born:

The patterns for these came from “Let’s Get Crafting” magazine who helpfully put all their patterns online too, so here’s the links if you want to try. The wool is double knit weight.
dolphin pig crocodile
and here’s a little red dragon that I made for myself by adapting the crocodile pattern.

Blankets - I’ve made a few blankets for my friends and their babies, the first one I made was a stripy red one for my friend’s twins.

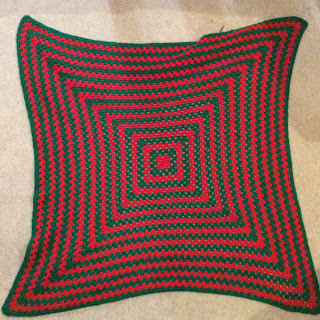
Here’s a granny square blanket that I made for us to curl up with on the sofa:

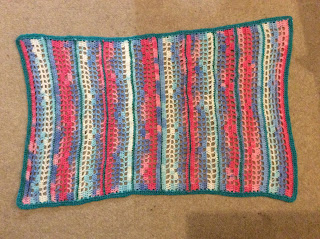
This one is one that I started not knowing who it was for and then I finished it when I got pregnant. I actually made two to the same pattern but somehow they ended up slightly different sizes. My tension isn’t always consistent so I like blankets because it doesn’t matter if they end up slightly the wrong size! It look like its lots of different colours, but it’s actually only two, the green sparkly wool and the rest is multicoloured random-dyed wool. The pattern for this came from “Let’s Get Crafting” as well so here’s the link Filet Crochet Blanket

Here she is when she was tiny under the blanket. She uses it for her dolls pram these days.

Baby clothes - I got a book of crochet baby patterns, so I made a couple of things from it, but the sizing seemed to end up a bit too big (could be my tension again) so I didn’t make too many after that.
Jumper - this one is for my cousin’s baby, it’s made with random dyed wool so that it can be stripy without having lots of ends to sew in! I made the 3-6 months size but it fitted him till he was a year old. The pattern is quite clever so there is only a small amount of sewing up, the centre back plus a small bit around the arms.

Coat - I made this for my daughter but it turned out that the sleeves were too long once she grew into the rest of it, and since it’s made of chunky wool it’s difficult to turn up the sleeves, so she hasn’t worn it all that much.

Dress - this was for my friend’s little girl for her first birthday. The zigzag stripes took ages with all the increases and decreases but it looks good in the end.
Other things - There’s a few other bits and bobs that I’ve made in the past few years.
Tiger gloves - I made some tiger stripy gloves out of chunky wool for my D&D character. I got the pattern from The Crochet Crowd, who do lots of free patterns and video tutorials, though they are based in Canada so the wool they use is not always available here.
Hungry Caterpillar - I made this as a toy for Grace before she was born. It was supposed to be about two feet long but ended up a lot bigger, I think I used wool that was heavier than the pattern intended. The original pattern is from a blog that doesn't seem to be active any more. If anyone wants the version I used, I have it written down somewhere so just drop me a comment.
Well I think that’s enough for now to cover the past six year of crocheting.