Thursday, January 26, 2012

Quilting: Sailboat - 26/1/12

This week's quilt block is a stylised picture of a boat. It has more pieces than the first two and so it's more complicated!
It has four colours and four different shapes. The colours are for the sky, the sea, the sails, and the boat. The shapes are small triangles, small recangles, long rectangle and trapezium (though you could make the trapezium out of one small rectangle and two triangles I suppose).
When you are sewing this block together, it's important to press the seams as you go, otherwise it will probably end up all lumpy at the back and won't lie flat at the end!
The pattern and number of shapes can be seen in the picture below
Cut pieces ready for sewing
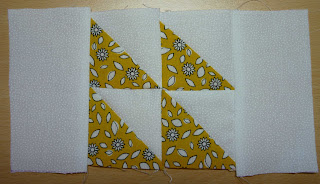
First you sew the small triangles of sky to the sails (to make squares):
Then you sew the small squares together to make a big square (as in the double four-patch block), and then the rectangles of sky go on each side:
For the boat/sea half, first the trapezium boat sews onto the triangles of sea, then the long rectangle of sea goes along the bottom:
Finally top and bottom halves join together to make the finished block

My block has gone a bit crooked, I think this is because my final seam wasn't straight. I'll see how well the next few squares turn out, and if it's too annoying I'll unpick it and re-do it.

Friday, January 20, 2012

Kindle cover - 20/1/12

Very productive today! Actually, I started this a few days ago but got a bit distracted.
My Kindle is 16.5cm x 11.5cm, so here's what I needed to make this cover:
  • Cotton fabric 35cm x 40cm (or two different pieces 30cm x 20cm if you want different pattern on the inside and outside)
  • Wadding approx 30cm x 18cm
  • Cotton thread
  • Sew-on velcro approx 10cm long
  • Flat elastic approx 20cm long
Here's a vague diagram of how the fabric and wadding relate to each other and the device:

I was adapting instructions to make a padded bag for a gadget, rather than a cover, so i didn't hem the cotton before I sewed the fabric to the wadding, but it would probably be easier if I had hemmed it first.

Mark lines along the cotton fabric spaced 2cm from each other (if you have a foot you can use as a guide, you don't need to do this although it might help anyway).

Then, you put a layer of cotton fabric on each side of the wadding, and pin all three layers together (if using one big piece of fabric, fold it in half and then put the wadding in the middle).
Using contrasting thread, tack the three layers together with long stitches.

Stitch back and forth along the 2cm spaced lines using your sewing machine (see the picture below). Leave about 3-4cm unquilted at one short edge for you to attach the velcro to.


Check that the piece is big enough to fit around your device once the quilting has been done. (Mine was too short, so I had to add another piece, but the measurements I've given above should be big enough for it).
Trim any spare wadding back to the last line of stitching, and sew the edges together neatly.

Before you attach the elastic to keep the deivce in place, it's probably a good idea to attach the velcro. The piece with the hooks goes on the inside of the cover on the part you didn't quilt (this should be on the half of the cover that will wrap over the front of your device) and then the softer piece can go on the back (behind where the device will be) and it won't catch on your clothes/bag/carpet/etc.

Now it's time to make sure your device won't fall out of its cover. Attach the elastic to the top and bottom of the cover.

My cover has a small flap along the top of the kindle to keep it in place (so one half of the fabric is wider than the other half), or you can just use elastic stretched across the width of the device and stitched at each end.

To keep the bottom of the device in place but still be able to press all the buttons, I stitched a piece of elastic diagonally across each corner:

And the kindle fits in its new snuggly home!

Open to read
Closed to carry about
I can take it out of the cover if I need to

Quilting: Whirlwind - 20/1/12

Another quilt block this week. This one is called 'Whirlwind' because it looks like a windmill. It looks quite complicated but it's made up of just 8 pieces.
The finished block
First of all, you sew the white triangles to the coloured trapeziums:
Then you stitch together one of each colour to make a bigger triangle:
And finally, you stitch the two halves together to make the square block.

I use the edge of the foot on the sewing machine to make sure the seams are the same width, but I had bought a magnetic guide before I realised the foot was the right width to use instead. It's coming in useful to keep the pins on as I take them out of the fabric:

Sunday, January 15, 2012

Quilting: Double Four-patch - 14/1/12

I've started learning to quilt, to make a sampler quilt made up of lots of different blocks with different patterns. Hopefully this means I can do some sewing but it won't take up too much of my time. I'm going to make one block a week, and this week I started with a double four-patch block. This is made up of two big blocks and eight little blocks, as you can see:

It's quite easy to make, first of all you sew together the smaller squares into a big square and then you sew all four big squares together. I'm using my lovely sewing machine to make this as I'm too lazy to hand-sew so much (also I'd just sew it wrong and have to unpick everything!)
If you want to make one yourself, my templates for the small squares are 63mm (2.5 inches) square, and the large squares are 112mm (4 3/8 inches) square. This gives you 6mm (1/4 inch) seam allowance, and the finished block is about 30cm or 12 inches square.

When I do more complicated patterns, I'll try to take pictures as I go along to make it clearer how you sew it together.